


 Forums Forums
StrategyFirst.com

|
 |
O.R.B. Environment Tutorial |
|
|
Adding Units and Adjusting Game Settings
To add ships on the map, go to the top menu bar and click Units > Brushpallette or press F7.
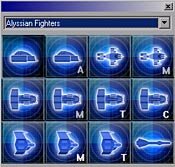 |
A Window similar to this one should appear. You can change your race selection by using the drop down list at the top.
To place a unit a on your map, left click on the unit in the brush palette. Now while the Brush pallet is open, hold down CTRL-SHIFT-ALT and double left click on the map.
You now gave a ship to the currently active player.
|
If you want to give ships to other players, you can change the active player by either pressing Q on your keyboard or by selecting another player in the Player menu.
What�s left? Adding starting player positions and adjusting game settings... To add player start positions you must first make sure you are in the 2D map view.
Once in 2D map view, go to Environment > Game Settings.
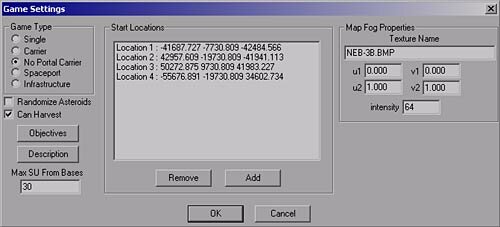
Now every time you wish to add a new player start position just click on Add, hold CTRL-SHIFT-ALT and double left click at the location you wish to add starting positions.
 |
To add another starting point you will need to click on Add again before double clicking somewhere on the map again.
This is how I placed my starting points in relation to my resource asteroids.
If you need to modify the position of one of your Locations you just need to double click on it in the Start Location list.
Set game type to No Portal Carrier, this will just give each player a carrier to build and harvest from.
|
There are 3 other game modes you could choose: Single is for campaign type maps. Carrier is similar to the one you chose but with a portal included to build Capital ships. In Spaceport you must first build the spaceports manually. Then it will assign player appropriately. Finally Infrastructure will let you set up how the player starts, his resources, his limit in tech etc... but it currently only works in skirmish mode maps.
The Randomize check box is used for asteroid belts in which you have checked the random option. This will recreate your belt each time the map is played. This should be functioning if your patches are current.
The Objectives and Description button will let you write a brief description of what your map is and set Objectives for the player. No triggers are associated with this, it�s only text.
Max SU from Bases: This lets you adjust the amount of SU the player gets when he upgrades his mines up to Military facility.
Map Fog Properties: This sets a background image for you 2D map view; it�s relatively easy to find out what image you must use. Just go to the Fog window, press the Properties button and copy the image file found at the right on the Pod field. In our case it should be NEB-3B.BMP.
And with this, our map is complete! You now simply have to save the file under the name you want and place it in the root of the scenario folder under bin/orbdata/scenarios.
Good Job!
Feel free to visit our scenario editor forum for other questions and requests and be sure to submit your final creations to us so they can be featured in the Levels & Mods section of the site.
|
|
|
|
|
Copyright © 2002 Strategy First Inc. All Rights Reserved.
|
