


 Forums Forums
StrategyFirst.com

|
 |
Gameplay Tips |
|
 |
|
Gameplay Basics
Please select a section from this submenu for more details.

|
Selecting Units
In order to control units, you must first select them. Controlling a unit includes moving the unit and issuing orders to it. You also select units to provide a focus for the camera. This allows you to keep an eye on your selected units by moving the camera to various points in space.
There are four ways that you can select a unit:
-
Left-click on the Unit: Health and Shield bars are displayed on top of the ship. These are visual indications of the current Health and Shield status of your units. For more detailed information, press the F2 key to display the Squad Manager Bar. A Doctrine & Action box interface is displayed at the top center of the screen, and the ship name is displayed in the top left corner of the screen. In Verbose Mode (see Moving Units, below), the icon is flashing. Left click again or press the "F" key to focus the camera on the unit(s).
-
Hold down the left mouse button and drag around the units to select them: All units inside the blue-dotted drag box are now highlighted. This type of unit selection is called �band selection�.
-
Press the Shift key and left-click on the unit: A �+� sign is displayed. This method allows you to band select units and add units individually by clicking on them. To remove units from the band selected group, position the cursor over the unit(s) you wish to remove. The �+� sign changes to a �-� sign. Now, simply click on the units you want to remove.
-
Press the �H� key to Hop between units: The camera hops between the various units, whether they are selected or not.
If you have a selected group, press the �#� key that represents that group: See Grouping for further details.
Moving Units
Use the Move command to dispatch your ships throughout the cosmos, engage in combat, and perform research tasks. Only ships using a defensive doctrine while under attack will respond without your intervention, so it is essential that you become familiar with this most basic game feature. You can move your ships in both 3D and 2D environments using the same procedures. To switch from 3D to 2D, simply press the Spacebar. You can also access the 2D mini-map by using the F3 key.
On the 2D map, different colored icons represent different elements. To find out what each of the icons on the mini-map represents, simply move your mouse over each icon.
-
Green icons represent friendly units
-
Red icons represent enemy units
-
Blue diamonds represent Nav Points
-
Blue squares represent debris
-
Grey squares represent unidentified objects (that is, out of sensor range; see Detecting Enemies)
-
Yellow icons represent Capital Ships
-
Turquoise icons represent Allied Ships
-
Blue orbs represent planets
-
Stars represent Starbases (Malus) and Spaceports (Alyssian)
The mini-map provides you with a good overall view of your environment, and is especially useful in determining the relative distance between various objects. You can also set Nav Points on the mini-map, and watch the action unfold in 3D in the Main Screen.
To move a unit, you must first select it (see Selecting Units). Next, you can press the TAB key to activate Verbose Mode. Verbose Mode is not required to move your ships, but they will be more easily recognizable in this display.

Now, press CTRL to display the navigational grid. Left click on the unit�s destination. A dotted trajectory line appears. If you are flying to a point in empty space, a Nav Point is created at the intended destination. Nav Points are markers that units will fly to when issued Move commands. You can set multiple Nav Points, and your units will fly to them in sequence before becoming Idle. You also use Nav Points to create Patrol Routes. Select the ships that you want to send on patrol, create waypoints, and then select �Patrol� from the Action menu. The units will continue to fly to each point until you issue a new command.
If your destination is an object, the trajectory line is drawn to that object. Now, release the CTRL key. The selected unit begins to move toward its destination, and �Move� appears in the Action box at the top of the screen. See the next section for more information about the Action box.
If you want to move to a number of locations in a specific order, simply press SHIFT (while continuing to hold down the CTRL key) and click on each of the target destinations. This creates Waypoints. Release CTRL and your units will immediately move to the first defined location. Press the �F� key to zoom in on your moving units.
The Action Box
The Action box, located at the top of the Main Screen, displays the commands that can be given to your ships. You will note that certain ships have commands unique to those ships. The graphic to the right contains standard commands for a moving vessel that is not involved in combat.
When your ship is not moving, �Idle� automatically appears in the Action box. When your ship is moving, �Move� automatically appears in the Action box. The following are explanations for the other Action box options:
-
Powerdown: When you select this option while your unit is moving, the engines are cut, and after a moment �Idle� appears in the Action box. Once your ship has stopped, the �Powerdown� option disappears from the Action box selections. Ships in this mode will not appear on enemy sensors at passive sensor range and the grey dots will not be displayed.
-
Dock Nearest Base: When you select this option, the selected unit(s) fly immediately to the nearest Base, where their Health and Shield bars are regenerated, and any torpedoes and missiles are re-supplied. To return your docked ships to active service, simply click on the name of the ship located in the top left corner of the Main Screen.
-
Self-Destruct: The selected ships are automatically reduced to space dust. This can be a useful option when you wish to prevent the enemy from seizing your ship. Also, the blast radius of a self-destructed ship can be large enough to do significant damage to enemy vessels.
-
Retire: The selected ships dock at the nearest base and are processed into RU�s. You can see your RU total increase when the ships enter the base.
-
Make Formation: Groups all selected units within a single fleet, thus allowing you to control them as one entity.
-
Break Formation: Dissolves your current formation. You now control each ship as a separate entity.
Grouping
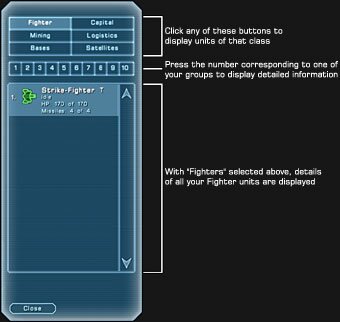
Grouping allows you to assemble and assign a number to several units for quick reference. To form a group, simply select the units you wish to include, and then press CTRL + NUMBER (1 - 9). Each ship in the group is now tagged with the selected number. CTRL + 0 disbands the selected group number. If you want to remove a ship from the group, press and hold the SHIFT key while left-clicking on the unit that you want to remove.
You can check on the status of a group and any ship under your control by opening the Squad Manager Bar. Press the F2 key to display the Squad Manager Bar. The Squad Manager Bar also includes detailed information about your units� Health, group, missile and torpedo load, current order and Shield status.
Detecting Enemies
All ships and bases use sensors to determine the range within which you (and your enemies) can detect objects. In the game, this is represented by the peeling back of an area of �Fog of War� to reveal any units or objects previously undetectable. There are two types of sensor ranges:
-
Passive sensor range scans a broad area, but does not provide details about any object within the detected area. For example, you will not know if a ship detected by passive sensors is an ally or an enemy.
-
Active sensor range clearly identifies objects in a smaller area, such as enemy ships.
When a unit is out of range of your sensors, it appears as a grey dot on the 2D map, and no information can be gleaned about it. Only when the enemy unit moves inside your Active Radar Range are you able to discern anything relevant about the unit.
For example, when a ship enters your Active Radar Range, you can position your cursor over the unit to determine its type (e.g., Fencer). When a unit enters your Active Radar Range, the dot turns from grey to red. You can zoom in for an even closer look at unidentified units within your Active Radar Range (in both 2D and 3D) by pressing and holding the ALT key while drawing a box around the unit.
Attacking Enemies
To attack an enemy, first select the units that will perform the attack. You can press the TAB key to activate Verbose Mode, which allows you a better view of your ships. Next, press and hold down the CTRL key, and select the unit(s) that you wish to attack. All selected units are now highlighted, and Health and Shield bars are displayed on top of each ship. The blue bar is your ship�s Shield indicator. When this bar is depleted, your ship will begin to take damage. Until that time, however, your Shields will continue to absorb enemy fire. In time, damaged Shields will be restored.
In addition, the names of the targets are listed in the top right corner of the screen, and a trajectory line is drawn between your ships and the selected enemy units. Release the CTRL key and your ships will move toward and attack the enemy.
|
|
|
|
|
Copyright © 2002 Strategy First Inc. All Rights Reserved.
|
